
In the frame of CBM/PdM, only representative samples are eligible for analysis. A documented oil sampling procedure is necessary to ensure a representative sample is being extracted at each sampling campaign. An oil analysis programme cannot be considered well implemented without a sampling procedure in place.
In this article, the aim is to emphasize the importance of having an internal, standardized, and documented oil sampling procedure in place before delving into its key contents and providing an example of an efficient one.
Why Establish An Internal Oil Sampling Procedure?
Establishing an internal oil sampling procedure is crucial for several compelling reasons.
Reliability And Integrity Of Oil Samples:
The primary objective of implementing an oil sampling procedure is to ensure the integrity and reliability of collected samples. Improper methods, kits, or locations can cause contamination or alteration of the sample, misrepresenting the true condition of the lubricant and equipment, and leading to misguided maintenance decisions. Standardizing and documenting the sampling process mitigates these risks, ensuring oil samples accurately reflect the current status.
Data Consistency And Trend Analysis:
Oil sampling procedures ensure that oil sampling tasks are completed consistently every time, across all people involved in oil sampling. Samples are always taken from the same location using the same technique, minimizing data disturbance and enabling meaningful and robust trend analysis over time, allowing maintenance teams to identify gradual changes in lubricant properties, detect emerging issues, and make informed decisions based on accurate historical data.
Knowledge Retention:
Only committed and trained personnel can consistently draw representative samples. A well-defined oil sampling procedure reduces the time needed to train employees, empowers employees with clear guidance and autonomy, and ensures tasks are performed efficiently. This approach helps retain critical operational knowledge, preserves best practices within the company, and reduces dependency on specific individuals, even with high employee turnover. Additionally, having an oil sampling documented procedure in place facilitates efficient scaling, making it easier to replicate the procedure for other equipment and locations.
Health, Safety And Environment:
Oil sampling involves interacting with machinery, handling hazardous substances, and potentially accessing dangerous areas. The oil sampling procedure should include health and safety measures to ensure compliance with safety requirements and reduce incidents & accidents. This not only protects personnel but also promotes a culture of safety awareness within the organization. Moreover, including the environmental considerations would help reduce the environmental impact and ensure compliance with relevant standards.
Key Components Of The Oil Sampling Procedure
Establishing an oil sampling procedure is like crafting a CV: there's no universal standard for format or content. Similarly, while a CV varies widely in structure and detail, it typically highlights educational background, skills, work experience, and achievements. Likewise, an oil sampling procedure is customized and should describe clearly and precisely how to perform this task, without forgetting the HSE aspects.
ISO 18430-1 includes an example of an oil sampling procedure, which covers guidelines for the following essential aspects [1]:
Preparation Phase:
The preparation for oil sampling involves a series of careful steps to ensure safety, accuracy, and cleanliness. It begins with following all applicable safety procedures, given the potential hazards of high-pressure fluids and toxicity. Technicians must review the sampling work order, gather necessary equipment, and verify the accuracy of sample labels. Before proceeding to the sample points, they should ensure all required information is available. Samples are ideally taken during normal machine operation, with the equipment running for at least 30 minutes before sampling, or within 15 minutes of shutdown if necessary. It's crucial to avoid sampling immediately after any disturbances to the lubrication system. The process includes cleaning sample point fittings, connecting sampling equipment, and flushing to remove debris. Technicians must ensure adequate system lubricant volume for flushing and properly dispose of the flushed oil. Finally, sample bottles should remain capped until the moment of collection, be filled to the required volume, and be immediately recapped after sampling. This comprehensive preparation ensures that the subsequent sampling process will yield reliable and representative results.
Step-By-Step Guide:
After completing the preparation steps, technicians direct the fluid discharge point into a waste container. They carefully activate the flow, being cautious with high-pressure systems. After allowing the required flushing volume to drain off, they place the sample bottle under the stream without touching the fitting. For compartments with cleanliness targets of 15/13/10 or below, additional steps are taken: the bottle is half-filled, recapped, vigorously shaken, and the fluid is disposed of before collecting the final sample. Once the sample is collected, the fluid flow is shut off. For manual vacuum pump sampling, used for compartments without dedicated fittings, the process involves cleaning the sample point, inserting a new section of sample tube into a vacuum sampling pump, and drawing samples from the compartment's central area. Similar precautions are taken for high-cleanliness targets. Drain point sampling, used when other methods are not possible, involves carefully draining a calculated volume of fluid before collecting the sample, avoiding the initial and final portions of the drain.
Follow-Up:
The follow-up phase of lubricant sampling encompasses a series of critical steps to ensure sample integrity and proper documentation. After sampling, technicians dismantle the sampling equipment, clean up any spills, and securely recap sampling points. Each sample bottle is immediately labeled with detailed information using a permanent marker, with pre-printed labels often used to facilitate this process. If necessary, sampled compartments are topped up with fresh and clean lubricant. The sampling area is thoroughly cleaned, and all waste materials are disposed of following environmental regulations. Technicians complete the sampling work order, noting any samples not taken and the reasons for omission to enable rescheduling. They then inspect the filled sample bottles, retaking any that are obviously contaminated, insufficient, or incorrectly labeled. The properly labeled samples are then prepared for analysis or shipping. If mailing is required, samples are appropriately packaged to prevent leakage, following relevant postal regulations. The goal is to send samples within 24 hours of collection. This comprehensive follow-up process ensures the reliability and traceability of the samples, supporting accurate lubricant analysis and equipment maintenance decisions.
Efficient Oil Sampling Procedure: A Summarized Visual Guide
By a summarized visual guide, we mean implementing something onsite that reminds a technician of the necessary information at the moment of sampling to draw the sample consistently.
To streamline the oil sampling process, commercial labs nowadays offer, within the oil analysis service package, access to their Data Management Systems (DMS) that enhance efficiency.
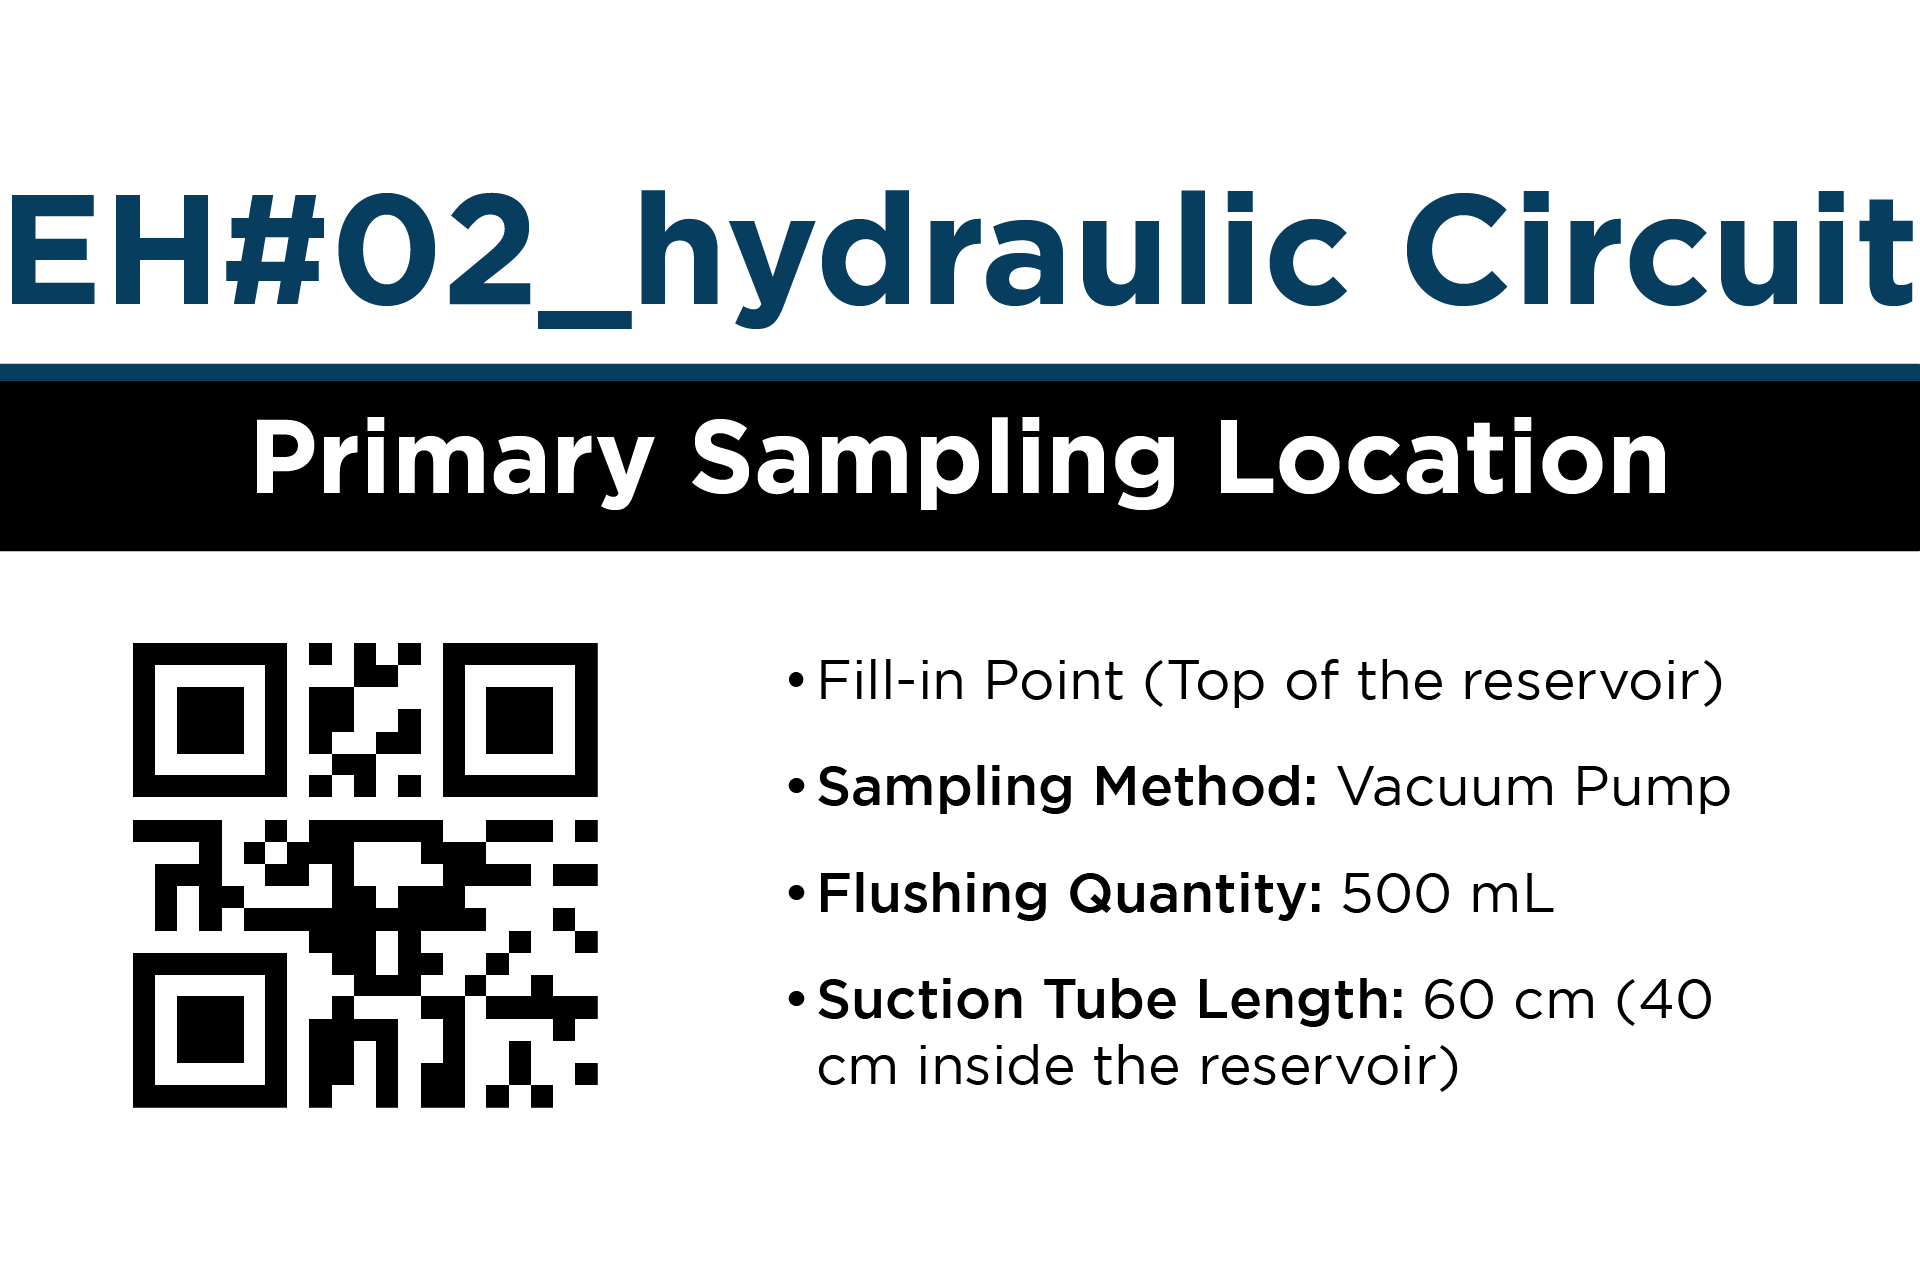
Many functionalities are available within these software programs, like generating QR codes to identify the component, generating labels to identify the sampling bottle, and allowing the establishment of a summarized visual guide. It could be as simple as a small piece of sheet stick on the equipment, which should be prominently displayed near the equipment where sampling occurs. It includes the following essential information:
- Component Identification: A QR code tag for the equipment can be generated from the lab DMS. No need anymore to fill in the sample label manually. Just scan the QR code with the mobile app and record the running hours of both the equipment and lubricant and/or the sampling date. All relevant information (component identification, lubricant in use unless changed, OEM, etc.) is pre-recorded. There is no need to manually enter repetitive details during each sampling event.
- Sampling Point Identification: Specify the exact location for sampling on the component. Differentiate between primary sampling points (for routine tests) and secondary sampling points (if applicable).
- Sampling Method: Specify the agreed sampling method. In the case of a vacuum pump, for example, specify the required length of the plastic tube to be used for oil suction.
- Flush Quantity: Flushing the sampling path is mandatory in all sampling methods. Provide the exact volume (in millilitres) of oil to flush before taking the sample. Apply the rule of 5 to 10 times and the minimum of 500 mL. The rule of 5 to 10 times to be translated and written directly as x ml of oil to be flushed before taking the sample to be sent to the lab for testing.
- Sample Quantity: The sample quantity depends on the quantity required by the lab to be able to perform all the required tests. However, there should always be an ullage to ensure a better preparation of the sample.
Ullage Standardization
The preparation of oil samples for laboratory analysis is a critical process that starts right from the collection site. One crucial aspect of this process is to leave enough ullage, or empty space, in the sample bottle. This space is essential for ensuring that the sample can be properly agitated upon arrival at the lab, enabling the re-suspension of any particles that may have settled during a long time of waiting to start the testing from the time of sampling to the time to open the bottle to start testing the oil sample inside it. This space allows the sample to be vigorously shaken, ensuring that any particulate matter that has settled at the bottom is evenly distributed throughout the sample. This is crucial for obtaining accurate and representative analytical results.
The amount of ullage required in a sample bottle varies depending on the viscosity of the oil sampled. Higher viscosity oils generally require more ullage to ensure proper mixing. The picture below provides guidelines for the required ullage for different types of oils [2]:
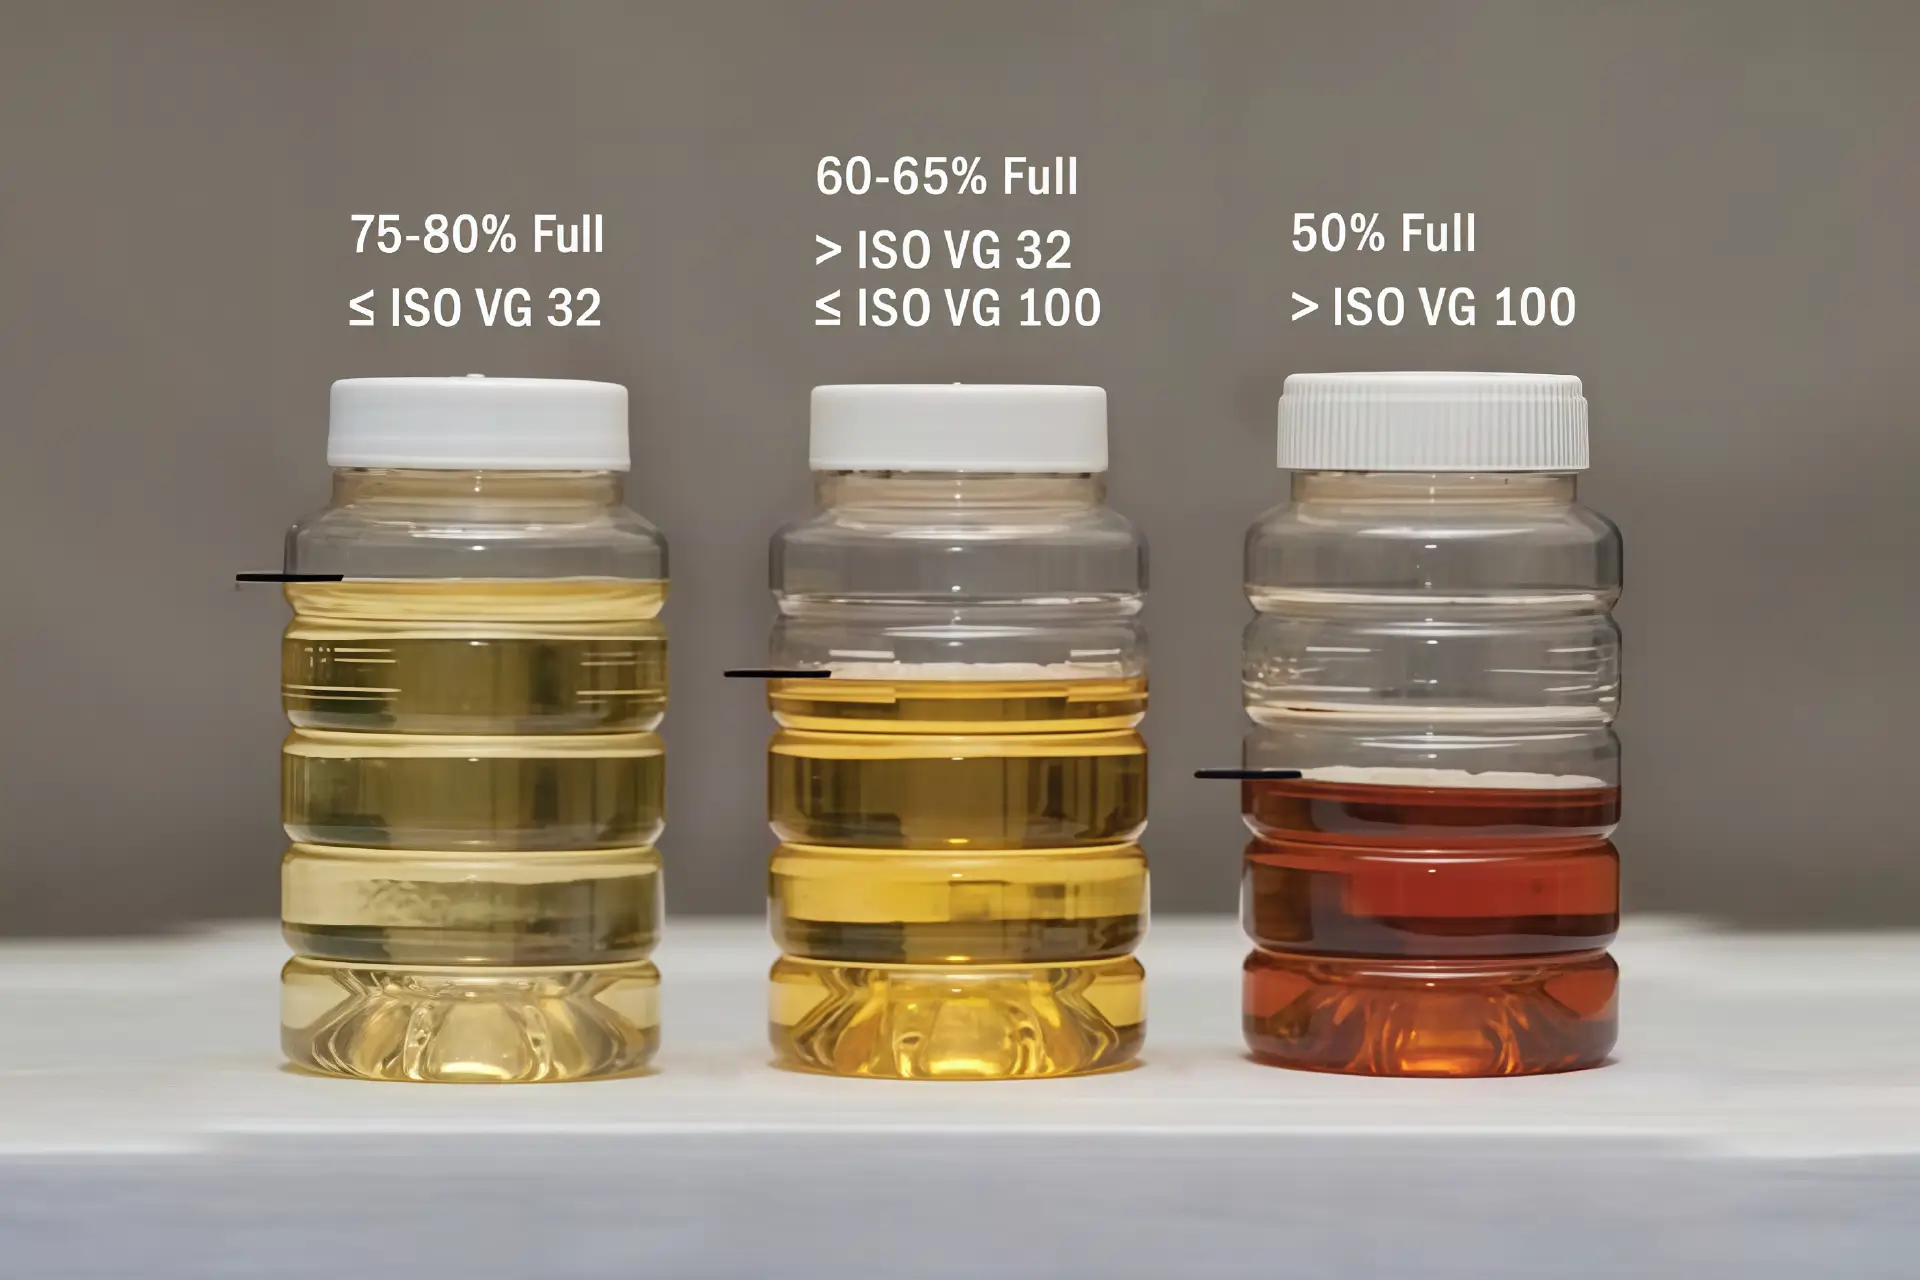
However, we should take into account the bottle capacity, and the quantity of oil required to perform all the tests should be provided.
When drawing oil samples in the field, technicians must adhere to the specified ullage guidelines to ensure that each sample is prepared correctly. This is very challenging! Generally, during a sampling campaign, technicians take samples of different equipment with different viscosities, and the oil testing packages are not the same!
The table below illustrates an example of such a situation. A technician should take one engine oil sample, one gearbox sample, and 2 hydraulic samples:
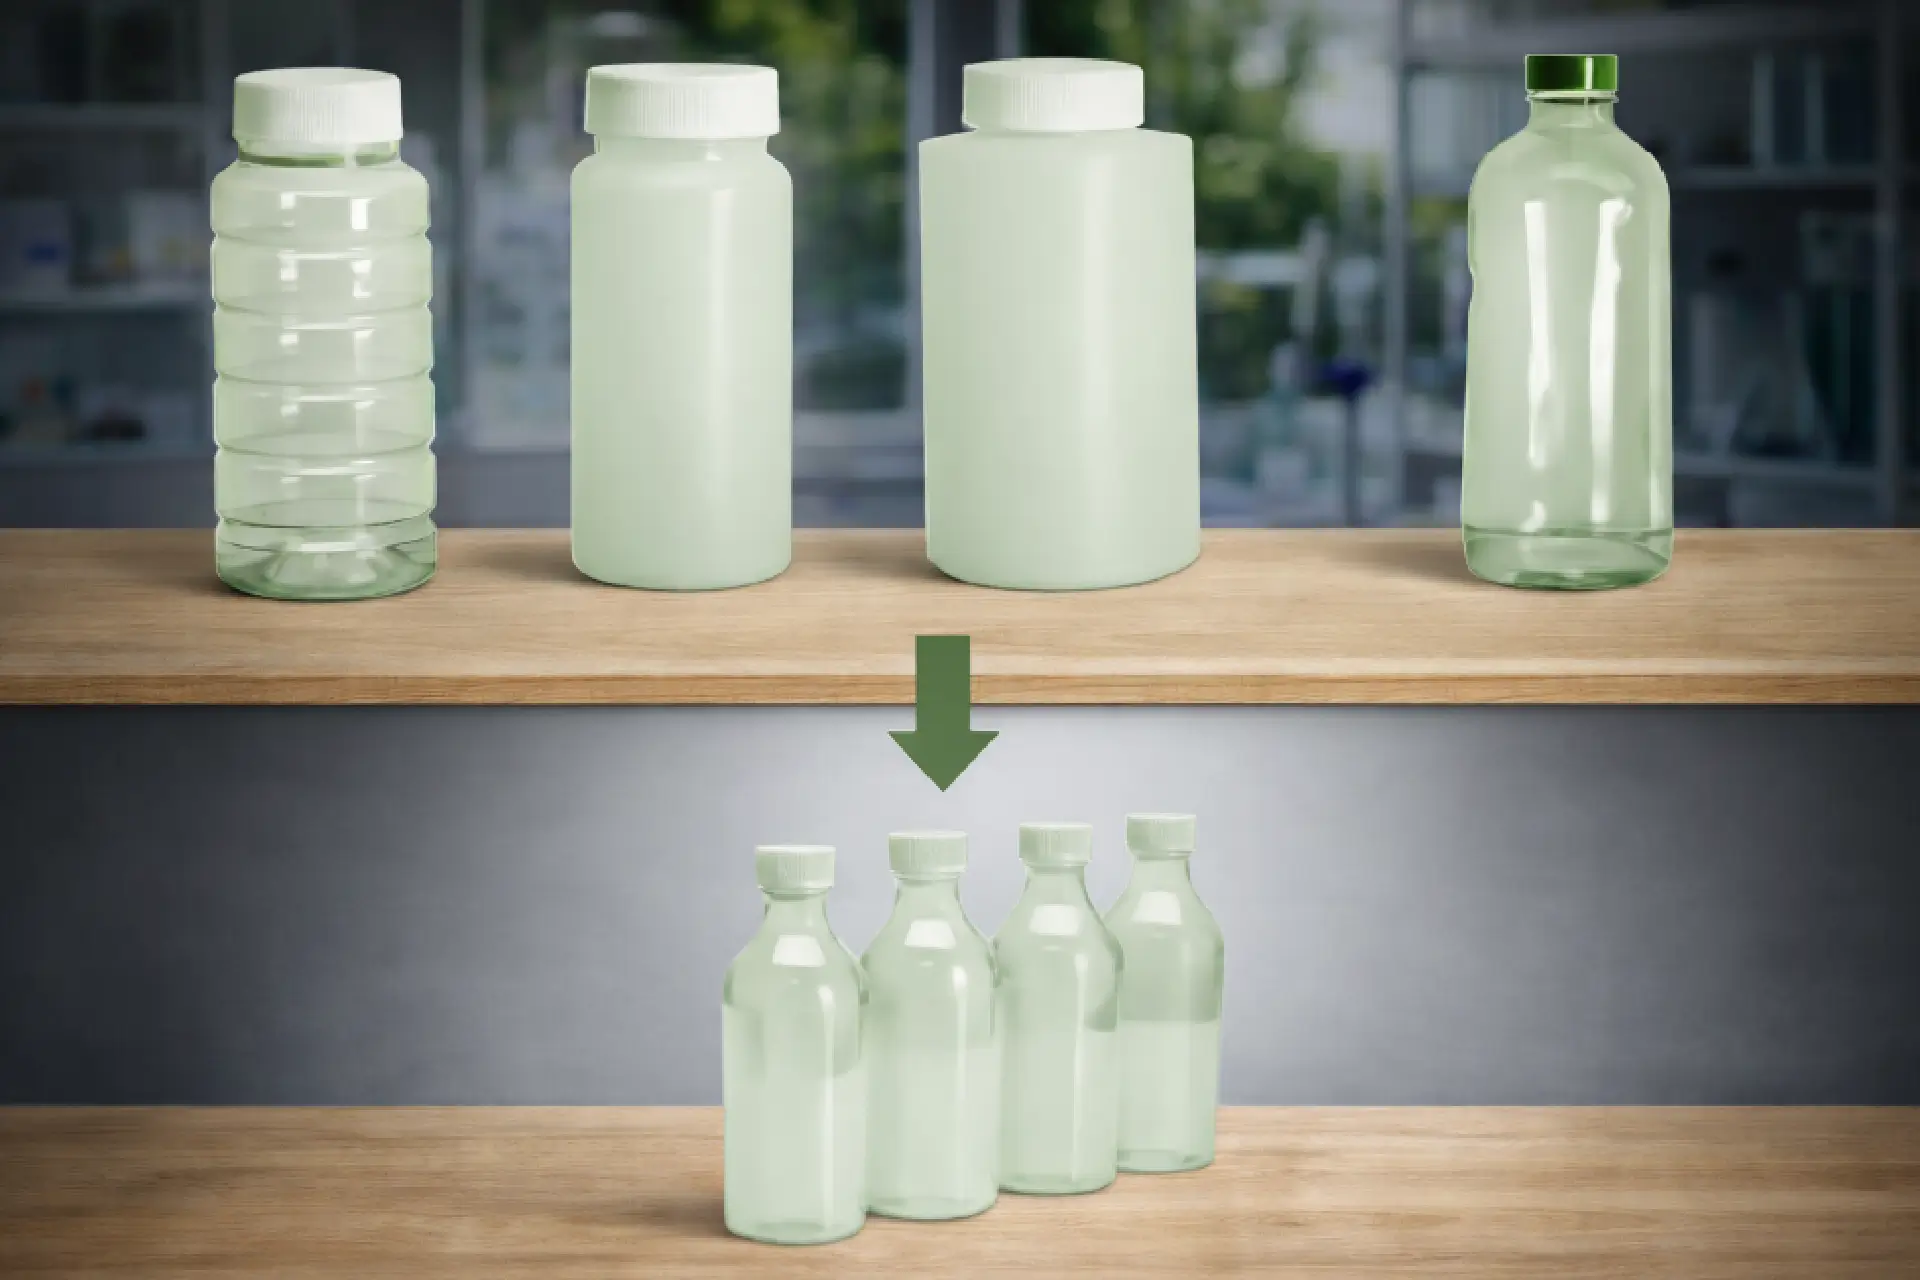
After the standardization of the sampling bottles, whatever the component to be sampled, the technician will use the same type of sampling bottle for all oils and equipment. Moreover, he will fill in the bottle all the time up to 50%.
The picture below illustrates a crucial evolution in the standardization of oil sampling bottles: One bottle type and one ullage. This will make them avoid confusion and inefficiency during sampling campaigns.
As the field of oil analysis and machinery lubrication continues to advance, the importance of standardized, reliable sampling practices will only grow. It is better to opt for a more efficient practice and implement an easy, on-site visual summarized guide for oil sampling, leveraging the capabilities of the new technology introduced by different labs and consultancy firms. Continuous improvement is part of the oil sampling procedure lifecycle, always striving for greater precision and efficiency in our lubrication management strategies.
References
[1] ISO 14830-1: Condition monitoring and diagnostics of machine systems - tribology-based monitoring and diagnostics - Part 1: General requirements and guidelines,
[2] https://www.machinerylubrication.com/Read/29662/oil-sample-bottles (consulted on July 11th, 2024).
About the Author
Electromechanical Engineer with ICML certifications in Machinery Lubrication and Oil Analysis (MLE, MLA, LLA). He currently serves as Regional Business Development & Technical Support Manager at SGS, where he develops Oil Condition Monitoring (OCM) services and provides technical support in Oil Analysis and Machinery Lubrication across diverse industries in Africa. He previously worked as a Global Oil Analysis Engineer at APM Terminals within the Reliability Center of Excellence, contributing to improved maintenance strategies and operational reliability.
Mr. Brahim El Asri
Regional Business Development & Technical Support Manager | SGS | Morocco